
 Generally, hollow section trusses and lattice girders are welded together in the workshop and delivered to site as a unit, this allows for better quality control and more efficient site erection.
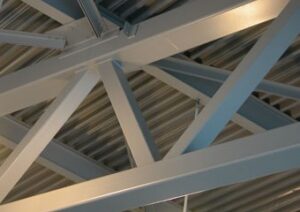
The trusses usually connect at each end to a support column, but they may connect to another truss forming a space frame.
Trusses may be fabricated from square, rectangular, or circular profiles and may be uniplanar forming a conventional configuration, or they may be triangular, forming a horizontal top boom with two vertical planes forming the triangular profile.
A rectangular or Box-truss configuration is ideal for lightweight, long span applications consisting of 4 chords laced horizontally and vertically on all 4 sides.
The box truss configuration is commonly used for enclosed walkways

Joints and Connections
This article uses terminology adopted by CIDECT (Comité International pour Ie Développement et l’Étude de la Construction Tubulaire) and IIW (International Institute of Welding) to define connection parameters.
The following illustration shows the joint notation for gapped and overlapped uniplanar K joints (See Joint Types). The numerical Subscripts (-0, -1, -2) are used to denote the member at the joint.

- Subscript 0 denotes the chord (or through-member
- Subscript 1 refers in general to the brace for T, Y and X joints, or it refers to the compression brace member for K and N joints;
- Subscript 2 refers to the tension brace member for K and N joints.
- Subscript i is used to denote the overlapping brace member for K and N overlap joints
Joint Classifications
There are five main classifications of joint types - T, Y, K, N and X Joints
K and N joints can be sub-divided into gap or overlapping joints depending on whether the bracings gap or overlap. Whilst there are more complex joint types, most joints can be categorized as one of these types for simplicity

Joint types may be combined, for example: A, K and T joint could be combined to form a KT joint, while a Y joint could be doubled to form a YY joint.
Likewise, the T and X joints could be doubled to form a TT and XX joint respectively.

Joint Geometry
The angle between the chord and a bracing or between two bracings should be between 30° and 90° inclusive. If the angle is less than 30° then the responsible engineer must:
- Ensure that a structurally adequate weld can be made in the acute angle
- The joint resistance calculation should be made using an angle of 30° instead of the actual angle
Joint Types

Traditionally, the design of lattice structures is based on pin-jointed frames, with their members in tension or compression and the forces forming a Node or Work Point (WP) meeting at a common point at the center of each joint. The usual practice is to arrange the joint so that the center-line of the bracing members intersect at the center line of the chord member creating a Concentric joint with either a Gap or Overlap which will depend on the relative sizes of the chord and diagonal members, together with their angle of intersection.

Sometimes however, it may be necessary to depart from the ideal noding conditions in order to achieve the desired gap or overlap conditions between the bracings.
Pulling the diagonals apart will create a Gap Joint with Positive eccentricity (e+) representing an offset from the chord center-line towards the outside of the truss - while moving the diagonals together will create an Overlapping Joint with a Negative eccentricity (e-).
Eccentricity is never a good thing as it creates a moment at the joint, however, moments due to eccentricity can be neglected providing the eccentricity is within the limits: e ≤ +0.25 (d 0 or h 0) (In line with the new IIW (2008) recommendations)
If the eccentricity is beyond these limits the effect of bending moments on the joint capacity should be checked by the responsible engineer.

Gap Joints
Where the diagonals are welded to the chord member, the included angle between a brace and chord (θ) should be ≥ 30°. This is to ensure that proper welds can be made. In some circumstances, this requirement can be waived but only in consultation with the responsible engineer and fabricator. To ensure that there is adequate clearance to form satisfactory welds, the gap between adjacent brace members should be at least equal to the sum of the brace member thicknesses (i.e., g ≥ t 1 + t 2).
Overlapping Joints
In overlapped K joints, the in-plane overlap should be large enough to ensure that the interconnection of the brace members is sufficient for adequate shear transfer from one brace to the other. This can be achieved by ensuring that the overlap, illustrated below, is at least 25%.
Where overlapping brace members are of different widths, the narrower member should overlap the wider one.

Where overlapping brace members, which have the same width, have different thicknesses and/or different strength grades, the member with the lowest value should overlap the other member.
When K- or N-joints with overlapping bracings are being used, the overlap may be made with a:
- Partial overlap - where the first bracing runs through to the chord, and the second bracing sits on both the chord and the first bracing, or
- Full overlap - with the second bracing sitting fully on the first bracing

If the overlap is very small (< 25) –the joint becomes difficult, if not impossible to fabricate as it means laying a weld on top of a weld. If this is the case, the geometry of the truss should be changed by either changing the angles of the diagonals (which is rarely a serious option) or move the intersection points of the diagonals away from the nodes creating an Eccentric joint
Notes!
The joint should never be made by cutting the toes from each bracing and butting them up together. This is both more difficult to fit together and can result in significantly lower joint resistances. A modified version of the type of joint can be used, provided that a plate of sufficient thickness is inserted between the two bracings.
The plate depth and width (bp) should extend beyond the joint to allow for the Fillet Weld

Welding
Normally, the weld should be around the whole perimeter of the bracing using buttweld, fillet-weld or a combination of the two. However, in partially overlapped bracing joints the hidden part of the joint need not be welded if the bracing force components perpendicular to the chord axis do not differ by more than 20%.
In the case of 100% overlap joints, the toe of the overlapped bracing must be welded to the chord. To achieve this, the overlap may be increased to a maximum of 110% to allow the toe of the overlapped bracing to be satisfactorily welded to the chord.

Weld Size
According to Eurocode 3 (CEN, 2005b), the following minimum throat thickness “a” for fillet welds around brace members, assuming matched electrodes and ISO steel grades (IIW, 2009):
a ≥ 0.92 t, for S235
a ≥ 0.96 t, for S275
a ≥ 1.10 t, for S355
a ≥ 1.42 t, for S420
a ≥ 1.48 t, for S460


